Showing posts with label gift making. Show all posts

Thursday, December 15, 2011

Giftmaking, redux (part 2 of 4)

Hmm, let's see now, what all did we get up to that day.... Well.

Well, we did make jigsaw puzzles. That was really fun. This is a project that I flat-out stole from Jack McKee's great book, "Woodshop for Kids" (lots and LOTS of great project ideas in there, and handy info on teaching kids to use tools wisely and well, too). I cut a puzzle 'blank' out of thin plywood and they sawed that blank all to bits with the coping saw. And then put those bits back together, painted them up, and voila! Homemade wooden puzzle, quite nice.

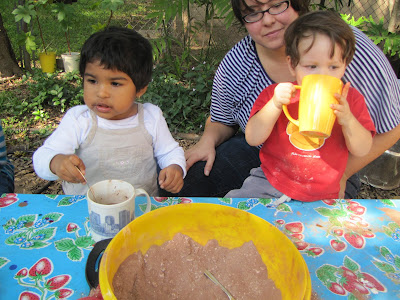
We also whipped up some peppermint creams, which was a recipe that I also scavenged from the amazing cookbook, River Cottage Family Cookbook (LOVE this book and all the amazing photos... so inspiring and enticing!). They're awesome because you're really essentially making ultra sweet peppermint edible playdough... which then dries into a melt-in-your-mouth little treat.
Peppermint Creams
2 c. powdered sugar
1 egg white
Peppermint essence
A few drops of cooking oil
Green food coloring (optional)

Mix up the sugar and egg white and peppermint and food coloring, if using... you will probably have to resort to squishing it together with your hands in the end, 'til all becomes a cohesive blob. Add powdered sugar as needed so that it's no longer sticking to your hands, but is easy to mold and work with, like play dough. You can then roll out the dough and use a tiny cookie cutter or jar lid to cut into nice little bite-sized uniform pieces, or you can just let the kids mold them into whatever shapes they want... which is what I did. They didn't look as pretty but believe me, they still got eaten. Rub a few drops of oil onto the piece of wax paper you have lined your cookie sheet with for easy removal.

We then dipped them in chocolate, which I had melted in this little crockpot. Optional of course, and I think this crockpot runs a little hot because the chocolate, by the time we got to it, was not smoothy, shiny, and looking forward to coating our delicious little treats, but rather in a more chunky, hard to work with state.... I shan't be using that crockpot for projects such as this again.

We also made fizzy bath salts, which I didn't manage to capture a photo of, but they are always a guaranteed hit and much easier to make than fizzy bath bombs, I believe.


There's lots of recipes out there, but here's the one that I like:

Fizzy Bath Salts
4 c. epsom salts
2 c. baking soda
1 c. citric acid
40 drops of essential oil ( I used pine tree and lavender, for a kind of holidays/ decompression blend)
food coloring optional

The food coloring might not show up in the mix, (and don't add too much, or the liquid will 'activate' the citric acid and the whole thing will fizz up and any fizzy action at a later date will be lost) but it will color the water when it goes into the bath. What could a parent or a teacher want MORE than a mix that will magically turn their bath into a fizzing purple whirlpool? Quite fun. Citric acid can be a little hard to find, but it is sometimes found in the kosher section of the supermarket as sour salt, and I also have seen it in the bulk spice section of our local gourmet grocery, Central Market.

Have fun, intrepid gifters~ more coming soon!


Wednesday, December 7, 2011

Giftmaking, redux (part 1 of 4)

I've been positively remiss in updating this poor dusty and neglected little blog, so if you've been eagerly awaiting the next chapter in my misbegotten journey, I apologize sincerely that I've kept you in a state of unbearable anticipation and irritable agitation.

It's really just been more of the same bla, bla, bla, repeating some of the classes that I have written about in detail on here before so I didn't think it was really worthwhile to write about it all over again. But then it occurred to me that I am rather proud at how my gift making class has evolved... it's a smidge better and more stream-lined than it was four years ago when I started ( can it really have been four years? Crikey!).

I'm sure I'm preaching to the choir here when I say that gift making is just cool. I really like to be part of shifting consciousness from getting to making and giving. Making is probably more fun in the long run, anyway.

I'll try to keep up with this and tell you all my ideas that we've been using in my giftmaking class over the next few weeks, just in brief. These ideas are pretty tried and true and I think I've whittled them down to the ones that are the most fun/easy/engaging and that are actually quite nice on the receiving end, as well. So, here we go:
  • Beeswax candles. I have a crockpot that I got from the thrift store which is reserved strictly for wax. This is SO much easier and better than trying to do it in a double boiler on the stove, esp. when you're doing it with kids and you need to get the wax down on their level. We made container candles... one is just a little mason jar with a wick in it. I actually taped four chopsticks together and then attached them onto a metal measuring cup so the kids could dip into the wax from a bit of a distance. A crowd of excited kids jostling around a pot of hot wax can sometimes end badly. Just sayin'. Also I had been using a plastic measuring cup and the fool thing completely melted into a misshapen plastic glob! Lesson learned. Oh yes, and the other container candles are poured into a gigantic acorn cap, from the giganto acorn bearing tree, the Burr Oak. I love these but have also learned the hard way not to fool around, and to use these as a centerpiece for your autumnal table ONLY when they are floating in a bowl of water. It's quite beautiful. But they can turn into fireballs otherwise (although we do all love fireballs, there's no denying). I need to find some more good wax projects. Kids really seem to get fascinated in exploring wax. I get a little tetchy because my beeswax is on the expensive side, but I should get some cheaper stuff so they could explore a la this project by Teacher Tom.
  • Dried flower centerpiece. This has been super easy and the kids actually LOVE it. We saw segments off of fallen branches we have lying around (pecan, crepe myrtle, anything really) and then let them drill holes in it wherever they'd like. I had a bunch of dried flowers and little pussywillow branches that my friend from Austin Ikebana had given me so they worked perfectly for this project. Dried grasses would also be nice and very zen.
  • In the blue-topped upcycled container we have cocoa mix. I use this recipe from Alton Brown. I actually think it's really really good. Kids say thumbs-up as well.
  • Lastly, we have made mosquito repellent in the blue bottle. Austin has been so warm this fall, mosquito repellent still comes in handy. This is an all natural recipe and it seems to work pretty well. It definitely is good for soothing bites, because witch hazel is all about that. The recipe I have been using is just kind of a mishmash from different recipes I have read about on the web. Here it is:
'The Bugs Don't Have a Chance" (product name by Max, age 10)
Scant 1/4 c. vinegar
1/2 c. witch hazel
8 drops eucalyptus essential oil
4 drops geranium essential oil
8 drops citronella or lemongrass essential oil
4 drops cinnamon essential oil
You can most definitely sub in other essential oils for these, there's lots of smells that bugs (supposedly) don't like.

So anyway, there you go, Quite nice, tune in again soon because I may just might have a healthy shake of new ideas for you (for once), actually.

Sunday, December 20, 2009

Candle dippin'


I'm so sad that my gift making class is over... it was the sweetest little group and I feel like there's so many projects left to do! For our last class we made beeswax candles, which in all honesty I was a mite bit frighted to try with such young folk... you know, hot wax and all. I had a revelation, however, when I thought of buying a crappy old crock pot at a thrift store and devoting it solely to the melting of wax. This way I can bring the wax down to the level of the toddlers, rather than trying to do it up on a stove top, which would be very ill advised. Also new was the idea of dipping the candle in a glass of water after dipping it in the wax. While it's not necessary, I think it helped the toddlers get a rhythm going... dip in wax, then water, repeat. So they were each able to make two little candles which they thought was quite neat. We then kicked back and relaxed with some mulled cider and kettle corn.... mmmm, so very cozy.


Saturday, December 12, 2009

Peppermint candies, sugar scrub, and dyeing play silks.


So much fun stuff we did during our gift-making class, I couldn't hardly manage to snap but one or two photos. We dyed play silks (and a nice tutorial about it all is here at the Artful Parent) though we did it a bit differently. We dip the silks in warm water, then sprinkle plain koolaid powder all willy-nilly over the silk however you'd like it, and you can also kind of get all finger-paint-y if you so choose (and the toddlers do choose) though I must warn you that your fingers will probably be pink or orange for the next day or so. Also the tutorial tells you that you should microwave the silks to really affix the color, but in my experience that kool-aid is powerful stuff. And I don't have a microwave. So I just let them set off to the side for several minutes, then we rinsed them and hung them outside to dry. You can buy the silks for cheapie cheap cheap at Dharma Trading Company. You know from some nice Waldorf-y store they cost like 8 dollars apiece if not more... plain silks from this place (average size) cost about $1.50, and you could also buy one of those long long long ones and dye it like a rainbow... you could also be all uber-natural-y and try to dye them with blueberries and pine needles and butterfly wings (butterflies who died from natural causes, of course)... there's a multitude of choices, and all of them fun. Do try it, won't you?
We also made these delectable peppermint candies from this fabulous cookbooks, The River Cottage Family Cookbook. I absolutely love this book: the recipes are divine, the photos are fabulous, and it's English so they're always making things like jellies and lollies and bangers and stuff like that. It's also got lots of really fun cooking activities to do with your kids... like having a pancake relay race on Shrove Tuesday .I don't know, that just sounds so fun, I've wanted to do it ever since I got this book, but Shrove Tuesday just keeps passing me by. I'll have to try to do it this year, for sure.
We also made this completely simple, satisfying (and softening!) sugar scrub, orange-lavendar sugar scrub to be precise.... it's a breeze to make and I was truly amazed when I tried it out on my rough, dish-pan little hand.... suddenly soft as a kitten. I think my boys and I will make some for their teachers.
Here are the recipes... maybe I should sit on them in the hopes that you'll take this class with me next year, but I don't care... all this is so fun and easy, and I just want to spread the homemade-gift love around.
Orange-Lavendar sugar scrub (copied directly from care2.com/greenliving )
OK, folks. Get ready for almost unbelievably soft skin (even for those of us with older skin).
The other day I was speaking with Larry Pleasant, CEO of The Vermont Soapworks, and he mentioned that he and his staff had spent the morning testing homemade sugar scrubs, and that everyone was commenting on how incredibly soft their skin felt. Aware that sugar cane produces glycolic acid, one of the natural alpha hydroxy acids that exfoliates the skin, I was immediately curious about his recipes.
Ingredients
50 percent white cane sugar (note that organic sucanat, while the best choice for food, doesn’t work as well for this recipe)
50 percent vegetable glycerin to moisten the sugar (I used avocado oil since I was out of vegetable glycerin and it proved to be a successful substitute)
Small amounts of aloe vera gel, vitamin C crystals, or anything healing that dissolves in water
1 or 2 drops of essential oil if desired (Larry recommends combining orange and lavender)
Enough ground hibiscus powder for pink color (if desired)
Combine the ingredients in a bowl. Scoop some of the scrub onto your hand and massage gently onto your skin for a minute (the scrub will actually tighten onto your skin like a masque). Leave on for 3 to 4 minutes before rinsing.
Let me warn you in advance that you’ll want to use this sugar scrub on your entire body. I started on my face, returned to my desk, and my skin felt so baby soft that the skin on my neck felt like sandpaper, so I needed to use the sugar scrub there, and on and on.
PEPPERMINT CREAMS (copied straight from River Cottage Cookbook)
This is probably the easiest bit of cooking you'll ever do. Not that anything actually gets cooked. You're really just making edible, mint-flavored Play-Doh.
Powdered sugar, 2 c. and a little more
Egg white
Peppermint essence
A few drops of cooking oil
Green food coloring (optional)
Sift about 2/3 of the sugar into the mixing bowl.
Lightly whisk the egg white in a cup with a fork. Should be well mixed and lightly frothy.
Pour the beaten egg white and a few drops of peppermint essence onto the sugar in the bowl, then use the same fork to start mixing the liquid with the sugar.
As the mixture begins to stiffen, scrape it off the fork and start using your hands to work it into a paste. It will probably be very sticky, and you'll have to keep adding a shake or two of sugar.
Keep kneading the mixture and adding sifted sugar until you have a smooth paste you can mold like Play-Doh. Keep your hands dusted with sugar all the time.
Now prepare the sheet of waxed paper by rubbing it lightly all over with a few drops of oil.
You can shape your peppermint creams in various ways. First roll out the dough to about 3/8 inch thick with a rolling pin-- but dust the work surface first with powdered sugar first or it will stick horribly. You can then cut the dough into squares, triangles, or diamonds. Or you can use small cutters to stamp out any shape you like. Then squish up the leftover mixture, reroll it with a fresh dusting of powdered sugar on the work surface, and make more shapes.
Or, if you don't have a rolling pin, you can simply roll little balls of the mixture between the palms of your hands (also dusted with powdered sugar), then flatten each ball a bit with your finger or thumb.
Place the finished peppermint creams on the lightly oiled sheet of paper. Leave them uncovered in the kitchen to dry out for a few hours. Keep them in a plastic container.


Sunday, December 6, 2009

Gingerbread pancakes and beeswax lipbalm

I found this lip balm recipe and I was so excited to try it with these kids, ages 2-3. Last year when I did this gift making class we made beeswax lip balm but it involved standing at the stove with a double boiler and the kids couldn't be super involved, because of the heat and the hot wax etc. I had to do the melting and the pouring, and then even after all that, the mixture separated after pouring and was basically hard wax with a puddle of nice-smelling oil on top... not really what I was going for. This recipe is awesome and totally interactive. You put the ingredients in a ziplock bag and then the kids can massage them around while submerging them in hot water... they all melt together and then you snip a little hole in the tip of the bag and squirt it into your container. Voila! And it was completely soft and delicious, balm-y for the lips. The only thing is you may have to grate your beeswax. If you bought your beeswax in that pellet form, I'm not sure if the water would be hot enough to melt it all the way down, so your best bet would probably be to buy a block of it and grate it. Here's the recipe:
1 teaspoon grated beeswax
2 teaspoons solid vegetable shortening (I actually substituted coconut oil and it worked great)
1 teaspoon pure petroleum jelly (In further experiments I think I will try to substitute this out as well)
1 drop candy flavoring (we used peppermint essential oil, seemed to work fine)
Place ingredients into new zipper-style plastic bag and close shut. Immerse bag into bowl of warm water. Squeeze the bag with your fingers to mix together the contents until the mixture liquifies. Cut bottom corner of bag and squeeze contents into a small sanitized (boiled)container. Let set.

We also made gingerbread pancakes... to give this as a gift you can just mix all the dry ingredients together and include the directions to complete the recipe on the container. Makes an awesome Christmas/Hanukah/Chrismukkah/Kwanzaa breakfast, I must say!


GINGERBREAD PANCAKES
1 1/2 cups flour
1 teaspoon baking powder
1/4 teaspoon baking soda
1/4 teaspoon salt
1/2 teaspoon ginger
1 teaspoon cinnamon
1 egg
1 1/4 cups milk
1/4 cup molasses
3 tablespoons vegetable oil
lingonberry preserves (optional)
Directions
1In a small bowl, stir together flour, baking powder, soda, salt, ginger and cinnamon. Set aside.
2In large bowl, beat together egg and milk.
3Stir in molasses, then oil.
4Add flour mixture and stir just until combined.
5Pour a quarter cup of batter per pancake onto griddle.
6Cook on first side until puffed, full of bubbles and dry looking around edges.
7Turn and cook until second side is browned.


Sunday, November 29, 2009

More gifties!

This time we made pumpkin-spice cake-in-a-jar, which is this really hilarious phenomenon in which you can bake a little cake right in a little mason jar, then pop the lid on right when it comes out of the oven and it will seal, and then it's perfectly preserved for at least 6 months.... a fun way to send a little baked goodie to someone far away. We also made fizzy bath bombs, which is REALLY exciting and they do fizz quite excitingly and dramatically as we observed when we tried them out in the water table. The only trouble is it's a bit hard to find the balance between making the mixture wet enough so that it will hold the shape of the mold, but not quite wet enough to start reacting (if it's too wet the citric acid in the bath bomb will start fizzing, not what you want). I used this recipe but I feel there is probably a better one out there. Last year I did this project with my gift making class and it worked out perfectly... need to search out the recipe I used. Alternatively you don't need to shape it into a 'bomb' at all.... just put the dry mixture in a jar, maybe with a little essential oil mixed in for delicious smells.... add a few spoonfuls at bathtime for fizzy delight!

By the way, citric acid can be found at Fiesta in the kosher section, also known as Sour Salt. Someone else said they saw it at Central Market in the bulk section. You can also easily order it online.


Wednesday, November 18, 2009

Sweet Spiced Pecans, among other things...


Today in our gift making class we made these delicious pecans (an ideal Texas gift by the way to send to relatives who don't live deep in the heart of Texas where pecan trees abound), also peppermint and sweet orange bath salts, and some fun playdough for good measure. Here's the recipe for the pecans... so easy to make, and delicious. A good sweet treat for youngsters, because if they're going to eat the sugar, at least they'll be ingesting a little protein, too. And put these on a salad for some real good eatin'.
SUGAR AND SPICE PECANS
from COOKS.COM
1 lb. pecan halves
1 egg white
1 tbsp. water
1 c. sugar
3/4 tsp. salt
1 tsp. cinnamon
Beat egg white and water until frothy, not stiff. Stir in sugar, salt and cinnamon. Add pecans, stir well until pecans are completely coated. Spread nuts on large baking sheet. Bake at 200 degrees for 45 minutes, stirring every 15 minutes. Remove from oven when "dry" and toasty. When cool, store in airtight container.
Pecans SHOULD be refrigerated or frozen (up to 2 years) in order to keep their freshness.

Monday, November 16, 2009

Making cocoa


We made cocoa in my gift making class on Wednesday, among other things. Of course we had to sample our wares. And of course I have to share these photos with you, because kids with hot chocolate moustaches are the cutest things ever.
We also made beautiful lacy golden crowns, as modeled by Violet in the pictures below.
Here's the cocoa recipe... it's the absolutely most divine recipe I've found. So easy and fast to mix up with your toddler or kid to give to to a teacher or auntie or friend. And it's so unbelievably good.
Ingredients
2 cups powdered sugar
1 cup cocoa (Dutch-process preferred)
2 1/2 cups powdered milk
1 teaspoon salt
2 teaspoons cornstarch
1 pinch cayenne pepper, or more to taste
Hot water
Directions
Combine all ingredients in a mixing bowl and incorporate evenly. In a small pot, heat 4 to 6 cups of water.
Fill your mug half full with the mixture and pour in hot water. Stir to combine. Seal the rest in an airtight container, keeps indefinitely in the pantry. This also works great with warm milk.


Friday, December 19, 2008

Dyeing playsilks, con koolaid


This was a fun fun project that was very quick and easy to do. You can get the silks at Dharma Trading Company, and they are cheeeeeeap!

I'm so glad I had so many

wonderful two year olds to help me with this project. They were really good at it. You just sprinkle koolaid powder as you like on the wet scarf. Put it in a ziplock bag. Squish it around if you like to move the color around. Put it in a microwave and zap it for 2 minutes. Ta da! The color has set. Rinse and hang to dry.

I read that you can also use a steamer, steam it for twenty minutes and it will have the same effect. I wanted to do this outside so I borrowed my friend's microwave so it made it more or less instant gratification.

Thanks to Melanie Anderson for the awesome photos!